Roger Bisby installs a Grohe Smart shower. What does he think about this box of tricks?
It is all very well having a ‘smart’ product, but if the plumber fitting it is not quite as smart as the product then what are you going to do? I spent a good 10 minutes looking at the instructions before I worked them out, and it left me feeling a bit stupid. The world has moved on, with international pictograms and emoticons, and smiley faces replacing simple dos and don’ts. So let me turn those symbols back into good old fashioned words.
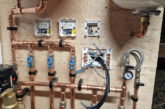
You have here a Grohe ‘Rapido Smart’ box which you set in the wall and pipe up so you can pressure test all the connections and carcassing before the tiling is carried out. There is a choice of valves to fit the box and you can upgrade or simply replace in a ‘plug and spray’ kind of approach. But there is no need to protect that shiny valve with a shroud during the build because that remains in the box. There have been a number of variations on this theme over the years but the big improvement here is that this Smart box allows you to configure the valve as you wish with no need to cross over pipes.
On the front of the temporary cover plate is a chart that gives you nearly all the various permissible configurations, so you just need to select the one you want and away you go. The idea is that with the Smart box you should never have to cross pipes over because the supplies come in from the bottom rather than the sides, so you can nominate the left and right ports simply by swapping over the buttons. I wanted to run two pipes to the shower head to achieve the two spray patterns and also one pipe to a handset.
The trouble is that the customer wanted a left hand handset and a right hand feed to the shower head, but the chart on the front doesn’t cover this option, which is why I said ‘nearly’ all the options. Having checked the flow rates, which are identical for the left and right ports, I could see no good reason why I couldn’t do this. I checked with Grohe and they told me it is perfectly OK to run the handset from either side of the valve, but I suspect most people simply take that chart as gospel and run it to the right.
My approach is that the last place you want a shower control valve is under the shower head. I like to reach in and turn the shower on before getting in and when I discuss this point most of my customers agree. In a hard water area, having a chrome valve under the shower head also means a lot more cleaning.
That little issue aside, the rest of the install is very simple. The box needs a minimum inset of 75mm, which can include the board and tile thickness, so it is perfectly easy to build it into a stud wall or a masonry wall. I was setting it into an aircrete block wall, and I decided it would be easier and stronger to cut the aperture through to the cavity insulation and then set in a double thickness of cement board to bring me back out to the required depth. This gave me an even and secure fixing. There are plenty of fixing holes in the back plate and you can even carry out a front fixing from the back if you have the option to come through from the other side of the wall. The really good thing is that even after all the tiling is done you still have six degrees of adjustment, so you aren’t going to have that nightmare where you put the cover plate on and it doesn’t quite square up with the tiles.
The second box in the boxed kit is for the shower head. This takes two 15mm supply pipes from the mixer valve so you can select the cascade or central jet simply by pushing a button on the mixer valve rather than messing around with a button on the head. If you press both buttons you get the two sprays at once. The procedure for fitting this box is slightly different to the mixer because ideally it should be done with a hole saw through the tile backing board. This gives the box support at the front as well as the back. The threaded connections marked A and B are on either side of the body. Again you can pressure test the whole rig before you start boarding and tiling.
You will notice that I have used a mixture of plastic and copper. The plastic is easier but I don’t want push fits or compression fittings buried behind tiles, so I tend to use copper if there is a bend in the pipe. It also helps with the offsets, so the straight runs are plastic and everything else is copper.
The second part of this job will be done after the tiling has been carried out. The customer is still undecided on the tiles so it might take a few weeks to complete.